December 30, 2025
Dental Implant Diagram: Anatomy, Parts, and Procedure Visuals

Have you ever assembled IKEA furniture without the diagram? You end up with leftover screws, a shelf that leans to the left, and a silent rage at page 7. Teaching implant anatomy without a dental implant diagram creates the same chaos, except the stakes are bone and biology. That's why I obsess over diagrams, and why I built this guide. Now you know. Stick with me.
Below you will find a structured set of implant visuals, including parts diagrams, procedure diagrams, and component views. Each image is described with clinical context so you can choose the right diagram for the right teaching moment.
Try the demo
Create your own dental diagram in seconds
Generate an AI illustration like the one in this article. No account required.
Dental Implant Parts Diagram
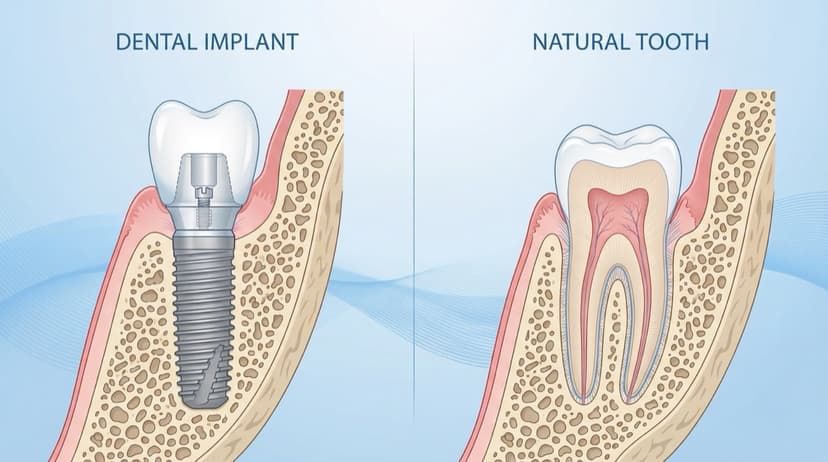
A dental implant parts diagram breaks the system into three core elements: fixture, abutment, and crown. The fixture is the titanium component that integrates with bone, the abutment connects the fixture to the restoration, and the crown restores the clinical form and function. This is the diagram most instructors use for introductions and quick refreshers.
The idea of predictable osseointegration is not a marketing slogan, it is the foundation of the field. To understand the biological basis of osseointegration and how bone remodels around implants, see our detailed guide on bone remodeling after tooth extraction. Brånemark (1985) and Albrektsson et al. (1981) taught us that bone-implant contact is the non-negotiable baseline. When students see it visually, it finally clicks. I mean it. I'm serious!
"Place the implant where the tooth should be, not where the bone happens to be."
Use this visual when you need a fast, high-level explanation of how the implant assembly fits together. It also works well for slide decks where each part is labeled in a separate callout or overlay.

Key teaching points
- The fixture is fully osseointegrated and never sits in soft tissue. Learn more about achieving optimal bone-implant contact in Zero Bone Loss Concepts by Prof. Tomas Linkevičius.
- The abutment creates the emergence profile and supports the crown.
- The crown is the prosthetic restoration and should sit flush with the abutment.
Dental Implant Procedure Diagram
A dental implant procedure diagram is most useful when you teach surgical sequencing. A four-step visual (site preparation, fixture placement, abutment connection, final crown) makes the implant timeline easy to follow and keeps attention on the clinical objectives. For surgical considerations on implant positioning, especially in aesthetic areas, see The Ideal Implant Position in the Aesthetic Zone.
Use this diagram in lectures, surgical workshops, and case review meetings. It helps learners associate each surgical step with its anatomical outcome. The most common teaching mistake is skipping the visual step for osteotomy angulation. The diagram fixes that in seconds.

Suggested sequence labels
- Osteotomy preparation and angulation.
- Implant placement with full bone contact.
- Abutment connection and soft tissue shaping.
- Final crown seating and occlusal adjustment.
Dental Implant Components Explained
A deeper dental implant components diagram focuses on connection type, platform switching, and tissue relationships. In advanced courses, these details matter more than the basic three-part breakdown. For example, internal conical connections reduce micromovement, and platform switching helps preserve crestal bone, as described by Lazzara and Porter (2006). For a deeper dive into the science and clinical evidence behind platform switching, read The Story Behind Platform Switching. You can also explore the biological concept in detail at Platform Switching: A Biological Concept.
Think of the implant-abutment connection like a great handshake. When it is snug and consistent, the relationship is stable. When it is loose, everything else suffers. That is why the visual matters.
This view is ideal for implantology courses or advanced prosthodontic lectures where you compare systems or discuss bone stability. It also supports faculty discussions about prosthetic design choices and biologic width considerations.

Clinical accuracy notes
- Figure 1 is intentionally simplified; internal retention mechanics and apical cutting features are schematic and vary by implant system.
- Figure 2 uses a generic screw head; most modern systems use internal hex/Torx drivers.
- Figure 4 uses "biologic width" as shorthand for supracrestal tissue attachment and simplifies cortical plate anatomy.
Download Free Dental Implant Diagrams
If you need ready-to-use visuals, start with watermarked free samples and then customize them for your course or lecture. PerioSpot Studio lets you generate transparent PNGs in minutes, so you can build cohesive slide decks without spending hours in manual illustration workflows.
Free sample pack (watermarked)
- Parts diagram (fixture, abutment, crown)
- Procedure sequence (4-step)
- Components view (platform and connection)
CTA: Create custom implant diagrams in PerioSpot Studio.
How to Use These Diagrams
A dental implant diagram becomes more powerful when paired with the right context. Use these visuals in different ways depending on your audience and objective.
Use cases for professionals
- Lecture slides: Standardize your teaching visuals across modules.
- Case documentation: Add clean diagrams to explain treatment plans.
- Research figures: Generate publication-ready images that match journal standards.
- Resident training: Provide consistent visuals for complex anatomy.
- Immediate implant protocols: Visualize placement timing with our guide on 12 Facts About the Bundle Bone, the Gap, and Immediate Implants.
For a deeper workflow look, see The Art of Dental Illustration and AI Dental Illustrations for Research.
Try the demo
Create your own dental diagram in seconds
Generate an AI illustration like the one in this article. No account required.
Conclusion
A well-designed dental implant diagram makes anatomy and procedure steps clear, accurate, and easy to remember. By using parts, procedure, and component visuals together, you can build a complete teaching narrative that works in lectures, consultations, and publications.
I built PerioSpot Studio because I got tired of teaching with mismatched diagrams that confused residents and slowed down lectures. For more clinical context on implant surfaces and their impact on osseointegration, explore Are All Implant Surfaces the Same?. If you want diagrams that match your exact case anatomy, generate a custom set in minutes and explore pricing.
A dental implant diagram is a map: with it, everyone reaches the same destination; without it, everyone gets lost.
Related Articles
Dental Patient Education Materials: Visual Resources for Modern Practices
Create professional dental patient education materials with AI. Free diagrams, illustrations, and visual tools for implants, GBR, and periodontal procedures.
Sinus Lift Diagram: Visual Guide to Procedure Steps and Anatomy
Professional sinus lift diagrams for dental lectures. Visual guide to lateral window approach, membrane elevation, and graft placement with free downloads.

AI Dental Illustrations for Research: From Sketch to Publication
Create publication-ready dental research figures with AI. Learn how to turn rough sketches into journal-quality illustrations in minutes, not weeks.
Try the demo
Create your own dental diagram in seconds
Generate an AI illustration like the one in this article. No account required.